The Leica Digilux 2 - a review
By Andy Piper
INTRODUCTION
“There was a little girl, and she had a little curl, right in the middle of her forehead. When she was good, she was VERY VERY good - and when she was bad, she was HORRID.” - Nursery rhyme
The Leica Digilux 2, and its Panasonic twin, the DMC-LC1, are an interesting exercise in digital camera design and ergonomics - in essence, a throwback to the shape and handling and analog controls of mechanical 35mm cameras from the last half of the 1900s. As an operating tool in the hand, the Digilux 2 is very successful. There are many shooting situations where being able to scale-focus the lens, or set the shutter speed on a dial - even before the camera has been turned on - greatly simplify and speed up operation, compared to the push-here-while-twirling-that-and-watching-the-LCD controls common on most non-SLR digicams. The Leica-designed lens is almost supernatural in its ability to define details and separate tones and colors, and pushes right to the limits of what 5 megapixels can record - a bonus I wasn’t even expecting.
So ideally, I’d start this review with the controls and handling and lens, because they are so distinctive.
But as a reviewer, I have an obligation to point out the worst features of the Digilux first - the HORRIDS. If you get past these and are still interested, then we can have fun with the camera’s good side - which is occasionally amazing.
THE HORRID
No RAW buffer
The Digilux 2 can save pictures in a RAW format. And it does have built-in memory of about 11 megabytes or so. Enough to handle a burst of three “finest” Jpegs (3.4 Mb each) in a little over a second before it has to pause and write to the memory card. But a Digilux RAW file is 9.6 megabytes, so it fills that memory with one picture, requiring a pause after every exposure. The “hang time” varies according to the capacity and speed of the memory card in use: 5 seconds or so for a fast type II 512Mb SD card, up to as long as 13 seconds on the 64Mb SD card that comes with the camera. Six seconds on my “regular” 256Mb Lexars. So - you can shoot fast, or you can shoot RAW. Not both.
As a photojournalist, I’d rather shoot jpegs anyway, as much for the time savings at the computer after the fact as those during shooting. A RAW workflow is like the Zone system - a brilliant tool for some kinds of photography, just not mine. But combined with the next issue, the lack of a fast RAW buffer has been a “deal-killer” for many photographers who might really like to work with the camera otherwise.
Excessive noise reduction in ISO 200/400 JPEGS
When shooting JPEGS at ISO 200/400, the Digilux 2 employs a rather heavy-handed noise reduction routine. In Photo.net’s review of the Digilux 1 people spoke of a “Seurat filter”. Well, this is more of a “Cezanne filter” - as though a palette knife had been scraped over the light tones in the image. Does a great job at removing noise. Unfortunately, it removes a lot of fine detail as well. And it mostly affects the lighter tones, whereas the strongest noise is in the shadows. Ooops! You end up with smeared highlights, noisy shadows, and a weird transition area between the two.
I queried Leica about what was going on here: Intentional noise reduction? Accidental JPEG artifacts? If it seems odd to ask for a manufacturer’s comment in a review, I guess it’s just my journalistic background - you ALWAYS try to get both sides. Here are the key points of their response, edited for space:
“Some noise at ISO 400 is not unusual for digital cameras. We tried to get a perfect colour management, sharpness and contrast but it is impossible to avoid completely noise....Image quality depends from the adjustments (colour, contrast, noise, sharpness). If you change the colour-management than you change automatically other settings or if you reduce the noise it could be that the images will not have the typical Leica sharpness. You can compare the effect with a 400 or 800 ISO film at the 35mm format. At 400 ISO there is a higher sensitivity. It is not a effect of jpeg compression. We are aware that noise is an issue so that we try more than our best to improve the technological and optical performance in future.”
Reading between the lines, I get the impression that Leica (or Panasonic, or both) was overly concerned with noise. They sort of ignored the fact that I was asking about the noise REDUCTION, not noise per se. Perhaps they were panicked by the hits the Sony 828 has taken on the subject - and overdid the noise suppression as a result. As a photojournalist, I’d prefer “sharp and noisy” to “blurry and noiseless”. Or at least the option to choose for myself. There are workarounds, which I’ll get into later. The most obvious one is to shoot RAW files, which bypass all “in-camera” firmware processing, and thus the noise supression. But get you back to the long delays between exposures.
And if a camera has a bug that requires workarounds - it’s still a bug.
The electronic viewfinder
Despite the Digilux 2’s vague resemblance to a classic rangefinder camera, it is not a rangefinder. The viewfinder is electronic - a TV set behind an eyepiece. It’s jittery and grainy. Not any uglier than other EVF cameras (except the new Konica/Minolta A2 - which is a big leap forward). Better than a videophone broadcast from Baghdad. But if you’re used to the crisp texture of an SLR screen or the brilliant clarity of a good window viewfinder, it’s unlovely.
In addition to its general ugliness, the EVF also has three specific operational issues.
First: Even at “90mm”, precise manual focusing is essentially impossible on the unmagnified screen. The camera can be set to magnify the center of the image 4x or 8x for manual focus (the magnification turns on when the focus ring is touched, and turns off a couple of seconds later), but even using this focus-assist, focusing at “28mm” is still troublesome.
Second: In really bright light the camera stops down the aperture to help control screen brightness. Usually - it opens back up for focusing (AF or MF). But on rare occasions (twice in 6 weeks) it has “forgotten” to do this. Using ISO 100 and a high shutter speed, this left me shooting at f/2.4 while trying to focus at f/5.6 (the reverse of an SLR, where you focus at f/1.4 and shoot at f/5.6). Even at “90mm” and with the magnification turned on, the DOF was so wide that an “infinity” subject still looked sharp with the lens set as close as 4 feet - a recipe for fuzzy pictures. Pointing the camera at something dark and trying again cleared the problem each time.
Third: the viewfinder lags behind reality by about 1/12th second (80 milliseconds +/-). The shutter lag on the Digilux 2 is pretty minimal, but the viewfinder lag has cost me ‘moments’.
That’s the bad news.
THE VERY, VERY GOOD (and the merely nice)
On the flip side, at ISO 100 the Digilux 2 produces jpeg images at the rate of 1 per second-and-a-half even in single-shot mode that are not just very, very good - they are astonishing. And when the final pictures are this clear and detailed, the fact that the viewfinder image is grainy becomes a minor issue.
THE LENS
The lens is a non-interchangeable 7mm-22.5mm f/2.0-2.4 Vario-Summicron zoom, equivalent to a 28mm-90mm zoom for 35mm film. The widest apertures at the marked focal lengths: 28mm f/2; 35mm f/2; 50mm f/2.1; 70mm f/2.2; 90mm f/2.4. Focusing and zooming are internal - so the lens never changes shape or size. Since the zooming is mechanical, it does not have to extend or retract during startup/shutdown, saving seconds. Closest focus is about 1 foot (.3 meters) - which covers an area of about 4.5 x 6 inches (11cm x 16cm) at 90mm - hardly macro, but tighter than most non-macro lenses, and much tighter than almost any rangefinder lens.
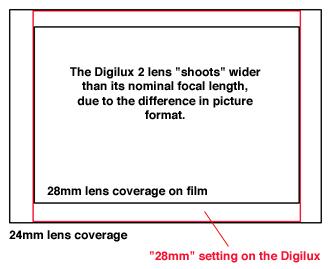
The Vario-Summicron “shoots” wider than its “28-90mm” rating. The focal lengths are accurate if you crop the Digilux’s 4:3 “ideal” format to the shape of a 35mm frame. But if you use the entire Digilux image, the results look more like 8x10’s (A4s) cropped from a 24-75mm zoom.
Personally, I love wide (my main film lens is a 21mm) - so I found this a pleasant surprise. The downside: at the long end, the V-S is barely a portrait lens - a “long” normal. Of course, many rangefinder photographers don’t shoot longer than 50mm or 75mm anyway - so it fits into the “rangefinder” ethos.
Leica’s film lenses have a slight bias towards cyan-green - or more accurately, away from magenta/red. The Vario-Summicron shares this tendency. It strips away magenta casts from sky and clouds. And water reflecting sky, or sky-lit shadows/shade, are rendered as cyan-blue, not purple-blue. Caucasian skin tones in sunset light tend towards golden, not ruddy. Darker skin tones are rendered in browns instead of purples. Evergreen trees are green, not brown or gray.
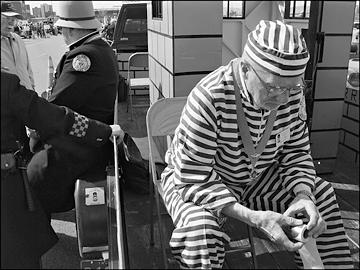
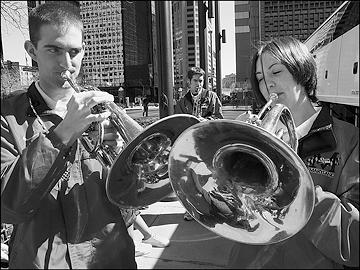
The lens is very sharp, has crisp edge definition, and does a superb job of separating and defining colors and tones. In most of my comparison images with film it has held its own alongside one of Leica’s “signature” film lenses: the 35 f/1.4 Summilux-ASPH. At its peak apertures (f/4-5.6) it is projecting details so fine that they start interacting with the Bayer pattern on the image sensor, producing moires - witness the clothing textures and ebony tooling in the bagpiper picture - and dropping out fine details against the sky - see the tail-less bird below.
Seems as though Leica/Panasonic have subdued or left out the “low-pass” filter in order to maximize sharpness, even at the risk of the occasional “eel”. (Moire, moray - hmmmm....never mind). Although the lens has a minimum aperture of f/11, diffraction begins to soften the image visibly below f/8.
At 28mm - barrel distortion is obvious, about 3-4% at the corners, and there is a moderate amount of purple/green color fringing (3 pixels-worth at the corners) in many pictures, Light fall-off is about 1.5 f/stops at the corners and is rather abrupt. (A note on barrel distortion - obviously a bad thing in many pictures. It does slightly reduce the stretching of faces and heads into football shapes (American football - rugby-ball elsewhere) near the corners, so it’s a mild plus in “people” pictures.)
At 90mm - no distortion I could measure, occasional purple fringing in dark objects against the sky, very low vignetting (looks like about 1/2 stop at its worst).
Since the true focal-length range is 7mm-22.5mm, depth of field is extensive. BUT - it isn’t infinite. It is very easy to get less-than-sharp pictures even at the “28mm” setting if you don’t focus carefully. At 4 feet and f/2 there is clear softening of the image from peak performance within 4 inches either side of correct focus. At “90mm”-f/2.4 the image starts to degrade visibly within 1.5 inches either side of correct focus. There’s a big difference between ‘apparently sharp” and really sharp. If you want to get the best this lens can produce - you won’t count too much on DOF.
The Vario-Summicron will blur backgrounds and foregrounds when used near its minimum focus at maximum aperture. When it does, the “bokeh” is about the prettiest I’ve ever seen - the image just melts away from “sharp” with a soft and delicate contrast, and no hint of bright rings or double images. But “bokeh” is obviously a non-factor in most Digilux 2 pictures.
In addition to the 3.2x mechanical zoom range, the Digilux 2 offers a 2x/3x “digital” zoom which transforms the lens into a “56-180mm” or “85-270mm”. As with all digital zooms, it simply magnifies the image from the middle of the sensor, without gathering any more detail. Essentially useless for anything other than 4x6 prints or video, IMHO - and at 3x, don’t expect to use the resulting images to prove you actually saw “Bigfoot” or “Nessie”.
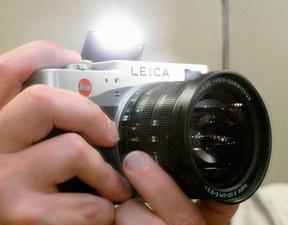
THE BODY
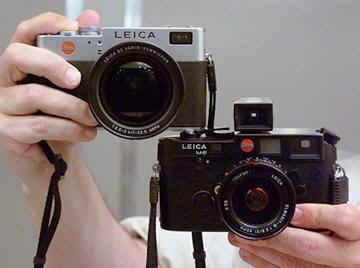
The Digilux 2 body is a basic Bauhaus “form-follows-function” box, with a lens on one side and a light-sensitive surface on the other. Even Louis Daguerre would recognize it as a camera. I’ve seen comments that it is “styled” to look like a Leica rangefinder. But with its squared-off ends and large (69mm diameter) lens - it reminds me more of a Canon 7 wearing the legendary 50mm f/0.95, or perhaps a Nikon SP with a Nikkor 50 f/1.1 mounted, especially if the Nikkor and the Vario-Summicron have their massive lens shades attached.
All of the “photographic” controls (exposure, focus, focal length, metering pattern, etc.) are analog dials, rings and levers. They all have a mechanical feel - though most obviously connect to electronics beneath the surface. The focusing ring is slightly “light” in touch, but allows one-finger focusing. The shutter dial rotation is oriented to match a Leica M6ttl or M7, rather than the ‘opposite’ design of older Leicas or the MP.
After you have used the on-screen menu lists to set up your major shooting preferences (RAW or Jpeg, image size/compression, saturation/contrast/sharpness, etc.) and minor shooting preferences (color or B&W, ISO speed), it is possible to take pictures for hours, or even days, in all the automatic or manual modes, without ever again looking at a menu or LCD read-out, or touching a push-button - except, of course, the shutter release.
Anyone who has ever used a Nikon F2 or Canon F1 or Pentax Spotmatic (or - yes, a Leica rangefinder) already knows where everything is and what it does.
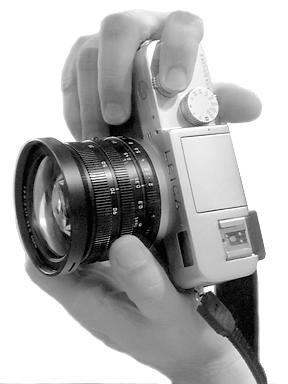
The ergonomics of the Digilux are superb. With its centered lens, it is easier to hold, and much easier to hold steady, than the “L” shape used for most other top-end digicams, because the left palm has a corner to provide mutual support, instead of thin air.Since people vary, there is no perfect size and weight for a camera. The Digilux is heavier than a Leica rangefinder wearing a tiny 35mm Summicron, and lighter than the same Leica with a 35 Summilux ASPH. My shoulder loves it - my hands might wish for an ounce or two more heft at slow shutter speeds. The bulk is just inside the large end of my comfort zone - about the same as a small motor-incorporated film SLR (Nikon N/F80, Contax Aria).
Build quality is average. I wouldn’t swear to any part of the body being metal, although some controls probably are. The lens barrel and rings are aluminum or some other light metal, not brass. And there’s a rather tacky seam down the middle of the bottom plate. But my Digilux took a 3-foot fall out of my camera bag onto carpeted concrete the first night I had it, and survived with no marks or damage.
As with most rangefinder cameras, the viewfinder eyepiece is in the top left corner. This has great benefits for right-eyed photographers: you don’t have to balance the camera on the tip of your nose (firmer support), people can see your face while you’re shooting (a good way to establish and maintain trust), and, in the case of the Digilux, you aren’t constantly planting nose-grease on the rear LCD. Left-eyed shooters end up the same place they do with most camera designs - out in the cold. (Has anyone ever built a camera that favors left-eyed photography? - seems unfair).
The analog controls, with each control handling one function, are very fast and very transparent. Not only can you set them with the power off, you can set two or three things simultaneously: left hand setting focus or aperture or focal length while the right hand is thumbing on the power and setting the shutter or meter pattern. All of which gets you to the important thing - pushing the shutter release - in the shortest time possible.
Turn-on lag time
Let’s turn on the camera and set the lens to 6 feet for a quick “scale-focused” street photography grab shot. We’ll use the Digilux 2, and a couple of other popular digicams, the Canon G5 and the Sony 828, which I tested at the local electronics-appliance store.
- On the Digilux: Total time to “ready to shoot” - turn on the camera and set 6 feet on the lens’s analog scale - 2.7 seconds
- On the 828: Total time to turn on the camera, turn on “manual focus” and set 6 feet on the LCD readout - 5 seconds
- On the G5: Total time to turn on the camera, turn on “manual focus” and set 6 feet on the LCD’s “thermometer” focus scale - 6-7 seconds
Not to pick on the Canon and Sony, which do pretty well as digicams go. But a manual-focus “feature” buried somewhere in the electronics is simply not in the same league as a focus ring on the lens that can be set with a flick of the finger even before the camera is powered up.
The viewfinders and focusing
I’ve already touched on the major flaws of the EVF. Every viewfinder ever conceived has been a Faustian bargain - there is always a trade-off between things it does well and things it does poorly. Rangefinder cameras can’t frame accurately, can’t focus closer than a couple of feet, have trouble aligning near and far parts of the subject precisely (parallax), and won’t work with zoom lenses - but are very quiet and smooth. SLRs solve the problems of the rangefinder - at the cost of noise, shake and bulk. Both can be very fast to focus and provide clear (if different) views of the world.
The EVF combines rangefinder quiet and smoothness with SLR-like framing, focus range, and zoom capability - at the cost of an unpleasant view and slow (if eventually accurate) visual focusing. And while rangefinders and even SLR screens can get out of alignment, with the EVF you are focusing using the actual pixels that will make up the final picture - the image sensor can’t ever get out of alignment with itself. It’s still ugly - especially when sitting on the sofa and “fondling” the little beast. But it’s funny - once I start shooting and paying attention to the world and the moments around me - how quickly the ugliness fades into the background. I’m too busy seeing pictures to notice.
Some people have experimented with using accessory viewfinders, rangefinder-style, to avoid the EVF. I tried it myself - and went back to just using the built-in finder. Didn’t like being limited to one or two focal lengths; didn’t like the parallax error; didn’t like the big lens protuding into the viewfinder corner; didn’t like the extra bulk on top. Very strange - since I use the same finders, with the same limitations, all the time for film photography.
I use all the camera’s focusing modes, depending on the situation.

At focal lengths above “50mm”, autofocus is usually fastest (the AF lock time is about 1 second). But I use manual focus when I don’t want the focus point to shift between shots, or when I’m using “trap-focus” for action - or simply to avoid the AF lag when the “moment” finally happens.
At 35mm and 28mm, I use scale-focusing for most fast work. For slower, critical manual-focus at f/2, I use the old film-maker’s trick of zooming in to focus and zooming out to frame.
Again, the logic of the analog controls comes into play. With two rings side-by-side on the lens, it is simple and fast to change focal lengths and click between manual and autofocus without taking my hand off the lens or the camera away from my eye.
The Digilux has a single AF point in the middle of the frame. The size of the focus area has two settings - a “spot” area smaller than 1% of the image, and a larger “box” about 1/5th the height and width of the screen. When using manual focus, the viewfinder can be set to magnify the center of the image when the focus ring is touched. At 4x, the magnified view appears in a box within the full-frame image, which supposedly allows one to keep track of the overall picture while focusing. At 8x, the magnified area fills the screen. I’ve discovered that: 1) 4x really isn’t enough enlargement for most critical focusing, and 2) holding the shutter button down lightly will turn off the magnification temporarily to allow a quick check of overall framing anyway (a nice “undocumented” feature). So I always use the 8x setting.
The internal viewfinder and rear LCD show identical views. Only one or the other is on at any time, and a button on the back toggles between them. The rear finder is almost as large as a 645 film frame, but is not hinged for low/high-angle shots. One very smart feature is that the viewfinder of choice can be set separately for shooting or reviewing pictures. So that flipping the shoot/review lever automatically switches you to your preferred viewfinder with one motion.
In shooting mode, four levels of information can be shown in the viewfinder.
The most basic shows you nothing but the image and the AF ‘box’ - until you touch the shutter button, at which point the aperture and shutter speed appear, along with a “match-needle” scale if you’re setting exposure manually. There is one bug using manual exposure in this view: the needle and numerical readouts won’t change in real time as you change apertures or shutter speeds. You must lift your finger and touch the shutter again to get an update on the “new” actual settings and metering.
A touch of the ‘display’ button overlays a “rule of thirds” grid on the basic image.
Another touch, and you get information overload: Exposure info, battery status, focus/flash/ISO/white-balance mode icons, remaining exposures, etc. etc. Las Vegas in a camera. But in this view, touching the shutter does turn on a “live” scale and readouts for manual metering that stay on for 10 seconds, or as long as you keep moving the aperture/shutter controls. Finally, you can add a live histogram (brightness only, not colors) to the “Las Vegas” view.
It is possible to see an "auto review" of each picture in the viewfinder after every shot, for 1 or 3 seconds. I immediately turned this off, since I am far more interested in the next picture than the one I've already taken. In which case there is simply a viewfinder black-out of 1 second while the camera starts to save the image.
In picture review mode, the camera can show your collected images as a 3x3 array of thumbnails, for fast navigation, or one image full-screen, or a zoomed view into that single image up to 16x.
Three levels of picture information can be displayed in the single picture/1x view: nothing but the image; basic picture info (frame number, date/time of exposure, file size/type); and the basics plus detailed exposure info (histogram, aperture/shutter speed, metering mode, etc.). It’s also possible to resize and crop images, set up DPOF info for requesting prints from a mini-lab, play slide shows and video, and some other stuff - none of which I use.
Neither viewfinder is especially good for critical evaluation of exposure, color, or sharpness. You can tell if you missed the moment, or if the exposure or focus were really off. Otherwise I save my editing for the computer monitor, where the images are generally sharper, warmer, and darker than the camera displays them.
I won’t go into all the possible menus that can be brought up on the screens - every possible control from setting the internal clock/calendar to choosing how many prints to order. I’ll just mention two other nice touches. You can select your 4 most often-used controls - perhaps ISO, contrast, white balance and auto-focus area - and assign them to a “quick function” list that can be accessed via the 4-way toggle button, saving a lot of scrolling through menus. And in most cases, simply touching the shutter button will “clear” all menus/functions and take you directly back to shooting. A fast “escape” key.
Shutter lag
I compared the shutter lag of the Digilux 2 to a Leica M6.
I found an intersection where a building blocked my view of oncoming cross-traffic, so that I couldn’t anticipate when a car would enter the scene. Then I shot a series of pictures with each camera, pressing the shutter as soon as I saw a car bumper appear from behind the building. Focus was set manually. With the Digilux, I shot two series, one using the internal viewfinder, and one where I watched the scene directly, to see if the EVF had any additional lag. In the resulting snaps, I marked how far the car bumpers had moved by the time the shutter actually exposed the picture. What I was measuring was shutter lag PLUS my reaction time - but it’s still possible to compare relative lag times.
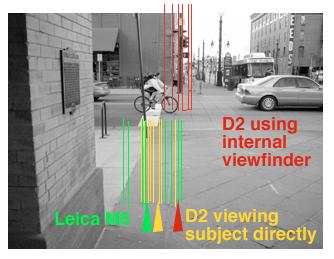
The diagram shows the results. Lines mark the actual bumper positions, the arrows mark the average for each group. Within each series, the variation is likely a combination of my reaction time and small changes in traffic speeds. The much larger variation for the M6 is interesting, and could be due to the mechanical linkage-chain in the shutter. The traffic was moving at 20 mph (I drove the street 3 times to check this) - which is 30 feet per second. Each foot of movement thus equals about 33.3 milliseconds.
- With the M6 (which has a known shutter lag of about 20 milliseconds), the average total distance traveled was 7 feet. Total lag (including my reaction time) was 233 msecs.
- With the Digilux 2 and direct viewing, the cars had, on average, moved an additional 1.5 feet, or an additonal lag of 50 msecs. Added to the Leica’s 20 msecs., that makes a shutter lag of about 70 msecs.
- With the Digilux 2 using the EVF, the cars had moved yet another 2.5 feet, on average, for an additional “viewfinder” lag of 83 msec., and an overall lag of 153 msecs.
Despite the long time needed to save RAW files, when shooting fine jpegs, the lag between exposures is 1 to 1.5 seconds, about the same as thumb-winding a film camera.
Camera noise
The Digilux 2 is essentially silent. When the shutter is pressed, there is a faint internal “tic-tic” (I think it’s the aperture blades shifting to shooting aperture). About on the level of the quietest leaf shutters, at most. No focusing sound - manual or auto. It’s possible to dial up one of three “Hollywood” shutter sounds (“clack”, “click”, or “cluck”) that play when you fire the shutter. But to use them you must also put up with a loud “beep” that plays when the AF locks, and EVERY TIME you press a button on the back: choosing from menus, setting functions, scrolling through pictures, deleting pictures, confirming deletes, switching viewfinders. BEEP BEEPBEEP BEEPBEEPBEEP. Obnoxious. And the “tic-tic” is enough to tell me the shutter fired. So I leave the noises off.
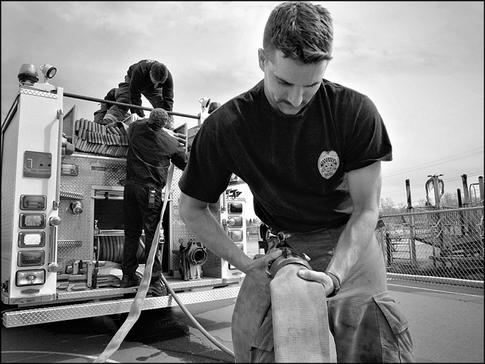
Funny how often people eventually asked “When are you going to take the picture?” - after I’ve already nailed a dozen candid moments and expressions from 4 feet away. Silence is golden.
The glove test
Just for grins, I put on a heavy set of ragg-wool gloves and tried operating the Digilux. In general, it was easy to handle all the controls (analog and digital) smoothly and without affecting neighboring buttons/rings/dials. Occasionally the focus would shift a bit when turning the aperture ring. The control wheel on the back was very slippery and hard to turn with gloves, but fortunately most of its functions can be handled by the 4-way button inside it, which worked fine. And while it was easy to slide open the door for the memory card and press/release it - it was then impossible to get a grip on the card and remove it the rest of the way. If you’re going to shoot in cold weather - start with an ‘empty’ memory card so you won’t need to replace it - or bring tweezers.
Flash
The Digilux 2 has a built-in pop-up flash. Press a button on the back once, and the flash head pops up to a 60-degree angle for bounce flash. Press the button again, and the base pops up another 60 degrees, pointing the flash at the subject. The bounce flash is surprisingly powerful. I get nicely exposed bounce shots even at ISO 100 in settings where my “film” flash (Vivitar 2800) often poops out on slide film. (Having an f/2 aperture helps, of course). Due to the 60-degree bounce angle, the flash provides a small amount of ‘kick’ light directly at the subject as well as bounce - but also sets a limit on how close you can shoot. Under an average ceiling, once you get closer than about 5 feet, the “pool” of bounced light is directly above, or even behind, your subject. Using direct flash, the huge lens shade will cast a shadow in the bottom of pictures shot at “28mm” - but the lens alone will not.
So far as I can tell, the Digilux has about every possible flash capability generally available - normal sync up to 1/2000th second (yes, 3 zeroes is correct!); slow-speed sync; sync at the beginning or end of the exposure (I refuse to call it “second-curtain-sync” when the camera has no shutter curtains); flash exposure compensation of +/- 2 stops for fill. The camera also has a standard hot-shoe, with dedicated contacts for use with Leica/Metz flashes. Other flashes with safe trigger voltages can be used, but must depend on their built-in automation rather than TTL. No PC outlet - you’d need some kind of adapter (radio, slave) for work with studio strobes. There is a physical lock/switch in the shoe that will turn off and lock down the pop-up flash if ANYTHING - even an accesory viewfinder - is mounted in the shoe. The switch also changes the flash firmware to “external-flash” mode - no pre-flash, but otherwise the same options as using the internal flash.
There is a separate “flash” white-balance setting to compensate for the coolish color of the flashtube. I “gelled” my flash for that warm “sunset light” look, and to balance with tungsten lights indoors, by the simple expedient of coloring a piece of translucent office tape with an orange marker and sticking it on the front.
EXPOSURE AND IMAGE CONTROLS
The Digilux can expose in the standard 4 modes - manual, aperture-priority, shutter-priority, or program.
These modes are set via the aperture ring and shutter dial. Set the aperture to “A” and the camera will choose the aperture as you choose the shutter speed. Set the shutter dial to “A”, and the camera will choose the shutter speed as you change apertures. Set both to “A”, and you are in program mode. The program mode can be biased towards either fast shutter speeds/large apertures or slow shutter speeds/small apertures by thumbing the serrated silver wheel on the camera back.
In manual mode you set both the shutter and aperture yourself, using the internal meter readout’s “needle” as a guide, or using a hand-held meter, or even just using the old “Sunny-16” rule-of-thumb. The meter can be set to center-weighted, spot metering, and “multi-area” patterns. The spot meter reads about 1% of the image area - roughly 2 degrees at “90mm” and 6 degrees at “28mm”. One advantage of a “shutterless” digicam is that the exposure can be metered directly from the live image sensor voltages instead of through a surrogate metering circuit/sensor.

The Digilux 2 uses this ability to “protect” the highlights when set to multi-area or centerweighted metering patterns. It pins the brightest pixels to about a level of 245-248 on the histogram, preventing burned-out whites.
Outside of ISO speed, there are 4 main “digital” image controls for JPEG shooting (they have no effect on RAW files). Contrast, Saturation, and Sharpness can be set to “Std.”, “Low” or “High”. And apparently this is the sole difference (except cosmetics) between the Leica and Panasonic cameras - the Panasonic’s settings are all a bit ‘higher’ than the Leica’s.
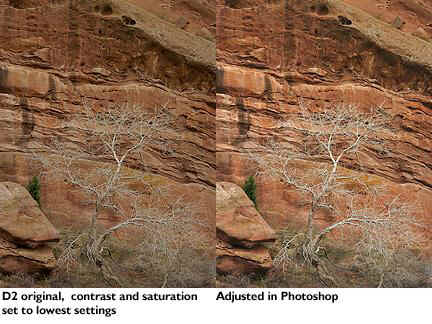
I generally work with sharpness set to “low” and the other two set to “std.” Setting contrast and saturation to “low” results in very softly toned images, with histograms that end well short of black and white, and the appearance of a freshly-born TIFF from a RAW file. An excellent starting place for some kinds of landscape work, with a long tonal range (but obviously not sharpness) that approaches large-format images.
Due to the meter’s habit of protecting the highlights, changing the contrast when using autoexposure has the effect of lightening or darkening the shadows - moving only the left end of the histogram.
There are also seven White-Balance settings: Auto, sunny, cloudy, tungsten, electronic flash, manual - and black-and-white.
Generally, I find the AUTO setting to be most reliable for daylight use. “Sunny” is generally too blue (especially here in Denver, where there is a lot of extra UV light at a mile high). Cloudy and flash go a bit overboard in adding yellow/red. Tungsten does OK, but undercorrects a bit, leaving some residual yellow under house lights.

The Manual setting also tends to run a bit on the yellow side. Looks great on the bluish LCD when reviewing pictures, but too yellow once the pictures are loaded into Photoshop. It’s the best choice under non-daylight light sources, but needs to have a lot of blue compensation dialed in if the light is short on blue wavelengths (see blue-channel issues below).
The B&W mode is interesting, and I like to use it if I am looking for B&W pictures. But it eliminates the option of playing with Photoshop’s “channel-mixer” after the fact to darken skies and such. Comparing a “B&W” shot of a Gretag ColorChecker to a color image converted via the channel-mixer, the camera’s internal channel-mix is roughly Red 35%/Green 55%/Blue 10%. JPEG files are actually monochrome RGBs, not grayscale. And the B&W setting doesn’t affect RAW files, which by their nature still contain the full color data from the original Bayer pattern of the pixels.
The blue channel has some issues, at least in JPEGS.
1) Testing color rendition with the ColorChecker, most colors are rendered quite well, but blues - especially dark “nylon sportswear” blues - and to a lesser extent, yellows, tend to hypersaturate.
2) Under lighting short in blue wavelengths - tungsten, fluorescent, sodium vapor - even when “white-balanced”, the blue channel develops large blobby noise, which shows up as an “underpainting” of yellow patches at all ISOs, but especially 400. The actual blue channel looks like a Kodalith image of out-of-focus oatmeal - no fine details, no tonality. Shooting at EI 100, manually white balancing, adjusting the white balance as far to the blue side as possible, and being generous with exposure (+1 EV) will boost the blue exposure to a reasonable level - pictures still need some Photoshop work to fix color balance and saturation, but at least the blue channel contains detail. The camera is still much happier with full-spectrum light (daylight, flash or blue photofloods).
3) Blue lights bloom excessively in night exposures (see section below on night/time exposures)
OVERALL IMAGE QUALITY
Let’s make it simple. I wanted a digital camera that could do better than the 2700-ppi scans I was getting from ISO 100/160 color negative films. I hoped wistfully for a camera that could come close to scans from ISO 100 slide films. That is what the Digilux 2 delivers. As I mentioned in discussing the lens, the sharpness and occasional moire patterns in fine details lead me to believe that Leica/Panasonic have chosen to limit the amount of low-pass filtration over the Bayer pattern - a route that Kodak, in the 14n/ProN/ProC, and Nikon, in the new D70, also seem to have followed.
(BTW, in the film/digital comparisons here, the Digilux 2 images were upsampled about 40% to match image size with the film scans. In the D2-only examples, the pixels are 100% as they came from the camera unless noted otherwise.)
At ISO 100 the images are very smooth and clean - not quite as sharp as Velvia, but a good match for the average 35mm 100 slide film. An overall look a lot like Ektachrome 100VS with some Kodachrome and Velvia touches thrown in - and with adjustable saturation and contrast. Clearly less “grainy” noise than scans from color negs. But there is occasionally a cyan-red patchiness (Chrominance noise?) in dark grays or blue-green areas like architectural glass.
The most startling thing about digital color is that, properly white balanced, it is remarkably clean and free from color casts compared to chemical imaging/scanning. There is something to be said for working directly from the subject’s original color wavelengths, rather than an image ‘filtered’ through various stages of chemical dyes and scanner/enlarger optics. It’s scary when you open a color image and all the grays have identical amounts of RGB - 160/161/160 or 120/119/120 or the like.
On the other hand, the Digilux 2’s jpeg images are somewhat “brittle”. If you don’t nail exposure, white balance, saturation and contrast in the camera, and have to start making major corrections in post-processing, they can fall apart rather quickly.
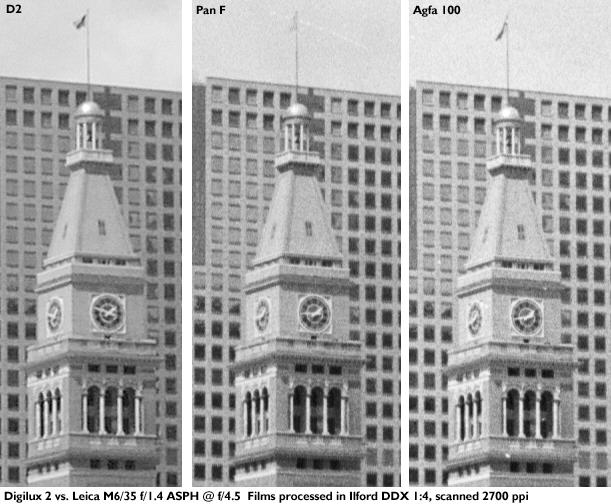
B&W pictures follow the same pattern. At 100 the Digilux is a bit ahead of “traditional” ISO 100/125 silver films in terms of grain/noise, but not TMax/Delta or ISO 50 film. Sharpness is a tiny bit lower, and the overall feel of grainless highlights and a touch of grain/noise in the shadows comes closest to chromogenic B&W films such as Ilford XP2.
Workarounds for using ISO 400
- Shoot RAW and accept the lag between shots
- Add some “grain” in Photoshop to fill in the ‘smoothed’ areas, and the results are still nearly as sharp as some “old technology” 400 B&W films.
- Set the camera contrast to “high” - which increases local contrasts enough to “burn through” a lot of the noise smoothing, but drops out a lot of shadow detail.
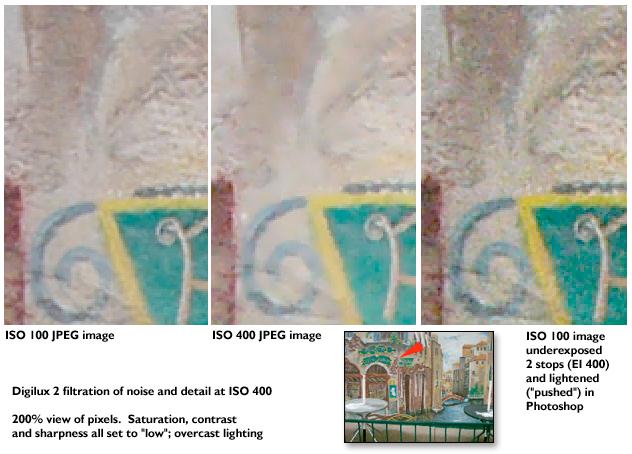
- Or my preferred technique when I need ISO 400 jpegs: set the camera to ISO 100, contrast and saturation settings to “low”, and underexpose 2 stops (EI 400 instead of ISO 400).
(Pause while the “expose to the right” fans stop choking and get their hearts started again).
Then I lighten the resulting dark images in Photoshop (after converting to 16/48-bits and upsampling to avoid posterizing/combing the histogram as much as possible) using curves and levels.
Outcome: almost no smoothing, at least a 4x increase in resolution over the “smoothed” parts of a straight ISO 400 picture, an increase in noise (probably to about where it would have been at 400 if Leicasonic weren’t smoothing it), and a slight increase in saturation. Nice crisp clear “ISO 400” pictures. Less grain than most 400 color negs I’ve scanned, a bit worse than Provia 400f, especially in the shadows.
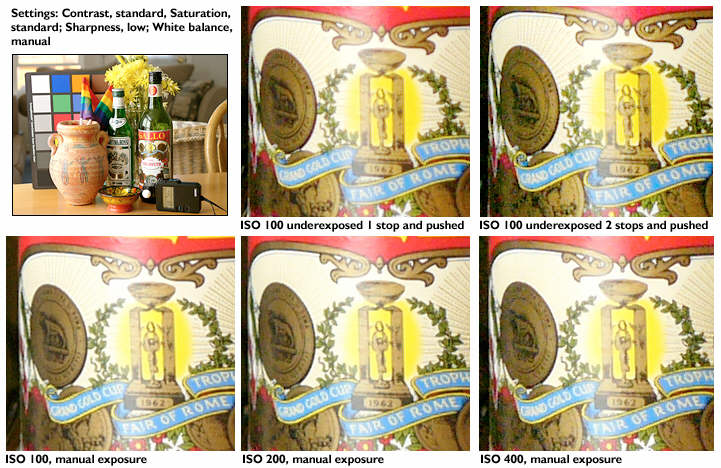
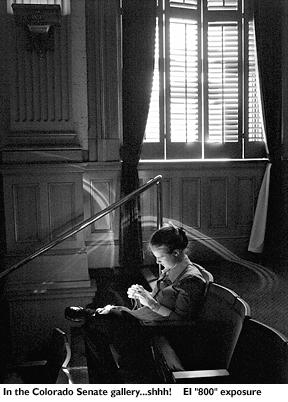
In the image above, the bottom row shows straight exposures at ISO 100/200/400. The upper images were shot with the camera set to ISO 100 but underexposed 1 and 2 stops and lightened in Photoshop. Note especially the faint rays in the top of the label - erased in the 200/400 exposures, retained in the “pushed” ISO 100 shots.
“Pushing” Digilux images beyond 400
The Digilux 2 is limited to ISO settings of 100/200/400. For many photographers, that’s not enough. Since my “push-processed” images from ISO 100 to 400 worked pretty well, I also experimented with underexposing and “pushing” ISO 400 images to higher EIs.
Put simply - the JPEG noise reduction at ISO 400 has already fouled the image so badly that it can’t hold up to any further strain on the pixels. Even at EI 800 the results are as ugly as the average ISO 3200 film. In a “news emergency” I could get a publishable newspaper picture at 800 or 1600, but not something I’d want to hang on the wall.
If Leica sees fit to change the firmware and make the JPEG noise-reduction “user-adjustable” - or if one works from RAW originals - better results may be possible. Otherwise, once the light drops below what f/2 and ISO 400 can handle, it’s time for an f/1.4 lens - on an SLR with a bigger chip and less noise reduction, or a film rangefinder. Or flash. Or (uggh!) a tripod.
Night shots
Speaking of tripods (which I normally use about once a year) - I did try a few long exposures. The Digilux 2 is limited to an 8-second maximum exposure time, and uses a ‘dark-frame’ second exposure to map and subdue ‘hot’ pixels. I don’t see much noise beyond the normal amounts for ISO 100 or 400 in an 8-second exposure - perhaps 50 specks out of 5 million pixels that might be under- or over-corrected hot pixels. The dark-frame exposure is not user-adjustable, and kicks in at 1/2 second - which snuck up on me a couple of times when I was making hand-held 1/2-sec. pictures.

The wonky blue channel shows its stuff. Blue lights ‘bloom’ like a 7-pixel gaussian blur, and over the rest of the picture the blue channel is essentially black. Red and yellow lights bloom a bit, green lights the least. White lights show purple fringes - red and blue blooming combined.
The attached image is a crop, but not a 100% view of the pixels.
IN SUMMARY
As an operating tool in the hand, the Digilux 2 is almost exactly what I wanted in a digital camera. I love the silence and stillness. I like the compact, grippable ergonomics. The manual controls, quick start-up, and short shutter lag simply outperform anything less than an SLR (and even a few of those) when it comes to fast work on the street, or wherever the action is. The ISO 100 image quality is extremely good - challenging the results from film scans with twice as many pixels due to the lens’s outstanding resolution.
I could wish for an alternative to the video viewfinder, so long as it retained the manual focusing, silence, and accurate framing. Don’t see any way to do it without giving up something else, though.
I could wish very strongly for an upgrade to the camera’s software that would make it possible to turn off the noise-suppression at ISO 200/400 via a menu selection similar to the color and saturation settings. Shouldn’t take more than 100 lines of code. Leica - are you listening?
I could wish for an 8Mp sensor to capture more of the lens’s abilities. And I’ll acknowledge the usefulness of a bigger buffer for RAW shooters - though I personally wouldn’t use it much.
No kidding around, though. If I weren’t primarily an ISO 100 photographer, and willing to use creative workarounds on the few occasions I need 400, I would not be nearly so happy.
This is probably as good a place as any to say that I did not buy the Digilux 2 for the Leica nameplate. I bought it for the straightforward analog controls. If Nikon or Canon or Minolta had produced a camera as ‘manual’ as the Digilux 2, I would have bought Nikon/equipment/canon/Minolta - whichever came first.
I chose the Leica over its Panasonic twin because it was available. As of this writing (late April 2004) I have yet to see a DMC/LC-1 in the flesh, whereas I’ve already shot 2200 exposures with the Digilux. That’s 60 rolls of film - or $660 in film/processing costs. So I’ve already recovered more than the Leica/Panasonic price difference.
Another 2-3 months of shooting, and I’ll be able to slap a “Don’t laugh - It’s paid for” sticker on the Leica. At which point the Digilux will be the same price as any other well-used digital camera - free. And I will still have the analog controls, comfortable ergonomics, and really impressive Leica lens to keep using forever - or what passes for “forever” in the world of digital photography.
Strong points
- full set of manual/analog photographic controls - even the “auto” settings are via dials, rings and levers.
- comfortable “35mm camera” ergonomics
- superb lens performance
- the “wideness” of the zoom at “28mm”
- dead silence and smoothness of shutter release
- short shutter lag
- compactness and light weight
- 100% framing without parallax problems
- extremely good “off the sensor” exposures, that protect the highlights in multi-spot mode
- viewfinder and rear LCD separately assignable to shooting and review modes (1-switch changeover)
- automatic ‘escape’ from most menus by touching the shutter button
- automatic ‘escape’ from focus magnification for framing by holding the shutter button
- built-in bounce-flash capability
Weak points
- excessive noise-smoothing at ISO 200 and 400, with no user control available
- long delays between shots when shooting RAW
- viewfinder “lag”
- the “ugliness” of EVF/LCD viewing/focusing in general
- too much DOF (on occasion) for reliable focusing with the EVF at 90mm and large apertures in bright light
- chip resolution that doesn’t fully support the abilities of the lens
- long end of the zoom range a bit short
- some often-accessed controls (e.g. focus magnification on/off) not available through the “quick set” of 4 custom functions
- and (yes!), digital image quality that is “only” better than most 35mm color neg. films, and can’t go places that Tri-X and an f/1.4 lens can go.
Basic Specs
- 5 megapixel 2/3rd” CCD image sensor - Bayer RGBG pattern
- 7mm-22.5mm f/2.0-2.4 zoom lens (35mm “equivalent”: 28-90mm)
- Smallest aperture: f/11 closest focus distance (all focal lengths): .3m (about 1 foot)
- filter size: 69mm
- internal electronic LCD viewfinder. Large 2.5” LCD screen on the back
- File formats: RAW, JPEG (3 levels of compression); 2560 x 1920, 2048 x1536, 1600 x 1200, 1280 x 960, 640 x 480, 1920 x 1080 (HDTV-format), 320 x 240 video
- Memory card: Secure Digital (SD) or Multi-media (MM): 5 RAW or 15 “finest” JPEG files (approx.) per 64Mb of card capacity.
- Connections: USB 2.0, A/V out/remote release, DC power in. Battery: proprietary 7.2V, 1400 mAh Lithium-ion (Leica BP-DC1-U, same as used in the Digilux 1)
- Comes with: battery, charger/AC power supply + cords, 64Mb SD card, A/V cord, USB cord, strap, lens hood, hood cap, lens cap, CD-ROMs with Photoshop Elements, ACDSee, and Silverfast (for RAW processing).
- Price: $1850.00 US
Additional functions that I don’t use, but may be of interest:
Video with sound at 10 or 30 fps, 320 x 240 resolution, about 8 minutes worth per 256 Mb of memory at 30 fps; stop-animation, (a series of “still” pictures that end up as a video file, for Claymation™-type animations); sound recording that can be appended to still pictures (news photographers could use this to have subjects spell their names, I guess); DPOF settings for ordering prints from a digital minilab; down-sampling and/or cropping of pictures in the camera; showing pictures as a timed ‘slide show’ on the LCD or a TV (camera comes with an A/V outlet and mini-plug/RCA cord); remote control from a computer via USB connection; direct printing to a USB-direct-print-compatible (whew!) printer.
|